Happy December, sweet friends!
It’s a fabulous time of year for DIY projects, wouldn’t you agree? I’m just loving so many of P Graham Dunn’s amazing DIY craft decor items...they make it so easy to customize and create with!
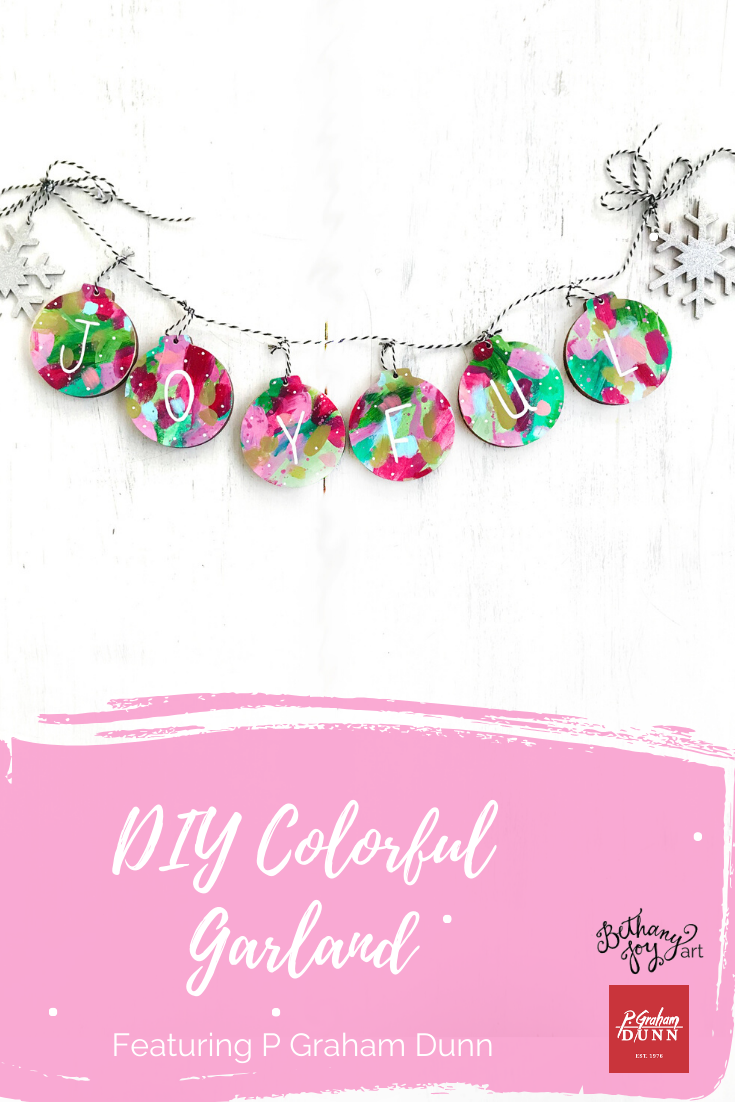
Today we’re going to use both their wooden Christmas craft ornaments and their wooden snowflake ornaments to make a super cute inspirational garland for the holidays! When you visit their shop, you’re going to want to use the code JOY during checkout for 15% off, then follow the directions below to create a garland you will LOVE!

Here’s my supply list for this project:
-Wooden ornaments from P Graham Dunn (one for each letter of the word you’re using...I used joyful but there's so many cute phrases/words you could use!)
-2 snowflake ornaments from P Graham Dunn
-Acrylic Paints
-Paint brushes (one tiny brush and one medium brush)
-Canvas Pad (like the one linked here)
-Elmers Glue
-Scissors
-Pencil
-Hole Puncher (my favorite is linked here)
Once you’ve gathered all your supplies, just follow the easy steps below to create your fabulous new garland! Don’t you think this would make a cute gift as well?!
Step 1: Paint your canvas
Using acrylic paint, cover a sheet of canvas paper with the colors of your choice. This step is really fun! I like to paint the colors randomly, with different colored brush strokes and splatters all over the canvas. I used shades of pink, red, green, and blue but you could do this with any color combo. You’ll be cutting this paper up into smaller works of art, so each one will look cohesive but unique!

Step 2: Trace, cut, and glue your ornaments
Once your painting has dried, flip it over to the blank back side and use a pencil to trace around the wooden ornament shapes. Then you’ll want to cut each shape out...don’t forget to use a hole puncher to cut the holes for ribbons. I simply used Elmers glue to adhere the canvas to each ornament and it worked great!


Step 3: Paint your letters
I used a tiny paint brush and some white acrylic paint to add a letter to each ornament. I had enough ornaments to spell out “joyful” which is perfect for Christmas and will also be nice to leave up for the following winter months as well.
Step 4: Decorate snowflakes
Now let’s decorate your snowflakes to add to both sides of your garland! I simply gave each snowflake a base coat of acrylic white paint and then used some spray on silver glitter to make each snowflake extra shimmery! If you’re not a fan of glitter, pearl/metallic acrylic paint would be another nice option to make your snowflakes glisten.
Step 5: Tie it all together
Now it’s time to add your ornaments to some string to create a garland! I used black and white baker’s twine for this step, but you could easily use jute, yarn, or some pretty ribbon instead. In order to make sure my ornaments were hanging correctly on my string, I tied a small loop on each ornament and then hung them on a main string, making sure to secure the snowflakes with knots since they’re on either end. I chose to tie some little bows on either end as well.
That’s it! Another easy, beautiful DIY project thanks to P Graham Dunn! You’re sure to wow your family and friends with this unique piece of handmade Christmas decor. Don’t forget to tag us in photos of what you make so we can share! You can find us both on Instagram @Pgrahamdunn and @Bethanyjoy_art. We’d love to see what you create!
Merry Christmas!


*this post was sponsored by P Graham Dunn