Happy February, friends!
Hopefully you’ve had a great month so far! And even though Valentine’s Day has already passed us by this year, I thought it would be the perfect time to do a little heart art DIY project...with P Graham Dunn, of course!

For this project, you will need:
-wooden heart shape from P Graham Dunn
-a variety of acrylic paint
-a drill and a small drill bit
-thick wire (I used a wire coat hanger)
-wire cutters
-hot glue
-pliers

Let’s jump right in and start creating!
Step 1:
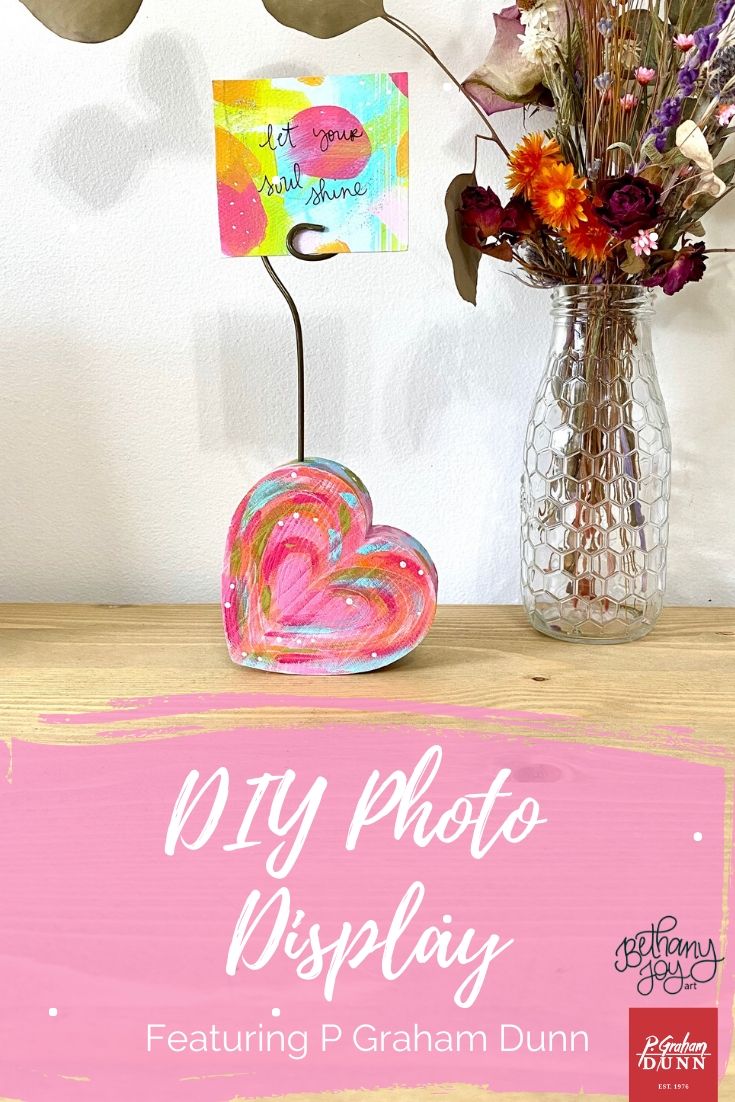
Paint the heart shape! You can customize this wooden heart in so many ways...seriously, the possibilities are endless! I chose a variety of bright colors and simply painted an abstract design on the heart. Don’t forget to paint the sides! The sides on this heart are extra thick...that’s actually why I chose to do this project, because the sides are thick enough that the heart can stand on its own! Allow a bit of dry time before the next step. Since we’ve used acrylic paint for this step, it should dry fairly quickly.

Step 2:
Gather your drill and small drill bit for this step. We’re simply going to drill a small hole for the wire to set in. You’ll want to prop the heart up on its side...however you plan on displaying it. Then you’ll want to make a small dot where you’d like the wire to be. After that, you’ll use your small bit to drill a hole in the heart (at least an inch deep). This step is quick, easy, and fun!
Step 3:
Now let’s cut and shape our wire. For this step, you will need your wire, wire cutters, and pliers.

*Be extra careful during this step!* The ease of this step depends on how thick your wire is. The wire I’m using is from a wire coat hanger, so it’s pretty thick making it a bit more difficult (but definitely not impossible!) to cut and bend into shape. Once I cut the wire, I used pliers to bend one end on the wire into a coil/swirl shape. That way, whatever photo I want on display will be able to slide into the coil.
Step 4:
Once you’ve gotten your wire the length and shape you desire, it’s time to attach it to the heart shape. For this step, I simply added some hot glue to the end of the wire and slipped it into the hole. The wire fits really well in the hole anyways, but I wanted to add the hot glue for extra stability.
Step 5:
That’s it! You’ve created your custom heart photo holder! All you’ve got left to do is to display a photo! The possibilities are endless here as well and the photo is so easy to change out so you can display something different as often as you’d like. I hope this got your creative juices flowing and I hope you love your new creation!
Sharing these DIY projects with you each month is extra fun for me. It’s an exciting new way to expand on my creativity and I just love having the opportunity to partner with the amazing folks at P Graham Dunn as well! I hope you enjoy this project as much as I did and don’t forget to use the coupon code “JOY” for 15% off your purchase with P Graham Dunn! Thank you for allowing me to share with you!


*this post was sponsored by P Graham Dunn